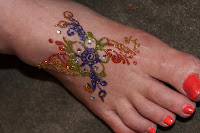
A friend of mine Dara Lightle has come up with a new concept of glue cones. It is an easier way to freehand glitter designs. The designs can be similar to henna. However, unlike henna it does not take forever to dry nor does it take 2 to 3 weeks to fade away. I have had fun practicing on family and friends! This is a fun new medium to add to my list of services. This would be great for prom or for parties. It would also be great to show off this summer at the pool with flip flops. The artwork will last 3-7 days. How fun it that!
Luv Ur Face
Friday, May 18, 2012
Pretty Glue Cone Henna
A friend of mine Dara Lightle has come up with a new concept of glue cones. It is an easier way to freehand glitter designs. The designs can be similar to henna. However, unlike henna it does not take forever to dry nor does it take 2 to 3 weeks to fade away. I have had fun practicing on family and friends! This is a fun new medium to add to my list of services. This would be great for prom or for parties. It would also be great to show off this summer at the pool with flip flops. The artwork will last 3-7 days. How fun it that!
Thursday, April 26, 2012
Very Busy Spring!
Wow! Spring has really begun! I have already been involved in 3 children's parties, Easter Egg hunts, farmer's markets, and will be doing a fundraiser here in South Riding. My new toy has been a huge hit!!! Parent's love the airbrush! It is fast, does not smear, and washes off very easily with soap and water. (Washes off more easily than regular face paint!) Something even more exciting??? You can use it at pool parties! I realize that it does not seem possible...however the secret to getting the paint off is soap. Regular, plain ole soap (oh and water of course;) It will not sweat off, nor will it come off with just water. I know it is crazy. Check out my video from the woman who pioneered the airbrush face painting stencil movement. The parent's were so excited that the kids could go into the bouncy houses and not get their art work smeared. The teenagers loved the fact that not only could I do a very cool eye design...I could also use the stencils and paint on their hair! They could have cheetah print hair, tiger striped hair, hair with hearts, etc. The possibilities are endless! Check out some of the cool work at the farmer's market with my new toy! Of course, I will ALWAYS do brush work. It is so beautiful for parties and events...but if you want fast and immediate results for those squirmy little ones...this is it!
Saturday, April 7, 2012
Wednesday, February 15, 2012
Mark Reid's Wolf Face
 |
| Yeah, I am thinking those "ears" look like little white devil horns to me;) |
 |
| Then you sponge on the gray under the ears and to each side of the focal point between the eyes and over the cheekbones. |


 |
| Now get out your #4 round and start the white fur on top of the cheekbones. |
 |
| Add the fur underneath the eyes in white, |
 |
| This is a better picture of the white fur. |

 |
| Now start to outline the ears with your #4 round. |

 |
| Add some fur on the top with some "tiger stripe " strokes. |
 |
| He then added some black on the eyelids. Notice the inside corner of the eyes...there is s little swoop down. |
 |
| Now continue to outline the fur with your #4 round and make the nose and muzzle with little dots in the muzzle. |
 |
| Here is a better picture of the face with out the fangs. |
 |
| Will wanted fangs instead of a tongue hanging down. I think if you add the tongue it might make the face look more like a husky. Mark also made the lips black. |
 |
| Now add the fur underneath the cheekbones in a jagged up and down motion. |

 |
| Now I get to try this at home! I love how the fur really contours the face. It is only three colors. |
Subscribe to:
Posts (Atom)


